Mo Research and Training Centre [POI]
Sept 29, 2016 15:17:53 GMT -7
Post by Ancestor Febrie on Sept 29, 2016 15:17:53 GMT -7
Mo Research and Training Center
1. Description
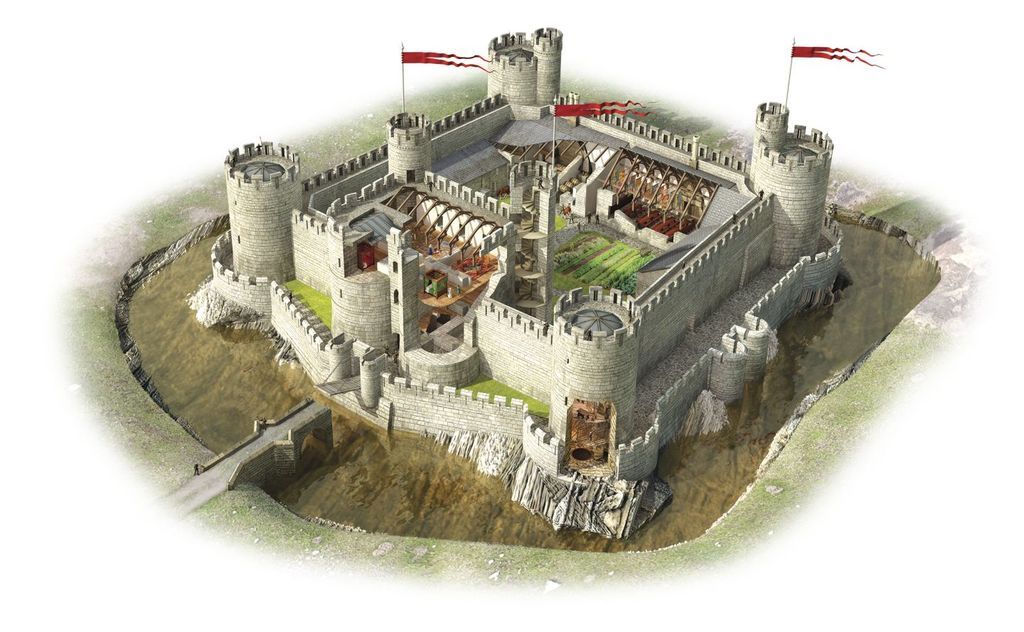
Deep within Mo stands the new and freshly built Research and Training Center which was generously funded by Zuruel Kedoin. There are no entrances or exits except the main one at the front of the castle, which can only be accessed via a draw bridge. This bridge is the only means to accessing the entrance of the castle due to the artificially created moat which extends all around the raised chunk of ground that the castle has been built on. Much like the name suggests, the purpose of the building is to research technological advancements and to train Mo troops. Despite this, however, the building’s heavy fortifications and security does mean that it can easily double out as a protective fortress in times of war.
2. Layout
2.1 Drawbridge
As mentioned previously, there is only one way in or out of the structure and that’s via the drawbridge. Generally, this drawbridge is kept lowered for ease of access to Mo citizens. This only changes in times of war, where the drawbridge will remain raised and will only lower for a few moments to allow appropriate citizens entry and exit. Highly trained guards are always kept stationed on the bridge that connects to the drawbridge when it is lowered. Regardless of circumstance, these guards will always check to ensure that only citizens of Mo are entering and exiting the castle.
2.2 Outer Walls
The entire Research and Training Center is built out of stone in the form of a very sturdy four-walled fortress. Embedded into each corner of the structure is a guard post, meaning a total of four overall. Each guard post is tall and reaches higher than the walls of the structure, giving all those inside a perfect vantage point and view of the entire surrounding area. Along with a spiraling staircase, each guard post is outfitted with tiny slits for soldiers to fire arrows out of. The only other notable feature around the outer walls would be the barbican, which sits above the gate behind the drawbridge. The soldiers camped inside usually act as the first line of defense against unwanted foes who may have somehow made it past the drawbridge.
2.3 Reception/Lobby
Once past the drawbridge and giant iron gate behind that, visitors will find themselves in a very welcoming lobby. This lobby contains rows of seats on either side and a tall closed off gate across the room with a receptionist sitting behind a desk in the middle. To get past these gates, visitors must either use their Mo citizenship cards to open the barrier or speak to the receptionist first for permission to enter. Beyond these gates is the second half of the lobby, which contains comfortable sofas and hallways which split into three different locations.
2.4 Empty Room/Under Construction
Towards the left of the Lobby is a long hallway that leads to an empty room. This area is under construction and contains nothing of any real interest or value. For this reason, it is usually kept closed off. Rumor has it that this room will have a Smithy built into it at some point in the future.
2.5 Training Area
Straight ahead from the Lobby is a door that will directly lead to a large open field that contains multiple pieces of training equipment scattered around the area. Generally, this consists of stuff such as dummies for target practice, weapon racks and designated areas for running, sports and sparring. The far side of the Training Area also contains an enclosed space with rows of chair and a small pool for swimming. Generally, this is where the citizens of Mo will be lead to and made comfortable while they watch the soldiers practice and train. Not only does this provide them with entertainment, but the atmosphere and cheering is said to motivate the soldiers into training more intensely.
2.6 Alchemy Lab
The right of the Lobby contains another long hallway which eventually leads to a locked door. For the sake of everyone’s safety, special permission is needed to earn a key card which gives visitor’s access to the Lab. Anyone who steps inside will immediately notice the walls, which are covered in blackboards. Unlike the rest of the center, the floor in this room is tiled in order to prevent certain spilled chemicals from burning all the way through. Visitors will also notice rows upon rows of state-of-the-art equipment spread along the Lab and several beakers which are constantly bubbling away in Zuruel’s private section of the lab.
2.7 Underground Prison
Rumor has it that the Lab is actually a front for a secret room which contains far more terrifying and heinous experiments. While no one actually has any evidence of this, there is a secret room somewhere in the Lab which is kept well-hidden and inaccessible thanks to a specialized nine digit lock which can only be opened by Zuruel. This door leads to stairs that will take the visitor to a secret Underground Prison. This area contains two cells, which usually house criminals or unfortunate targets that Zuruel may have been specifically asked to bring in alive. Being sound proofed, it is impossible to hear any of the prisoner’s screams and the layers of concrete around the area also prevents enhanced vision or X-ray from discovering this area’s existence.
2.8 Torture Chamber
On the far side of the Underground Prison stands a sturdy iron door. Behind this door is a freakish Torture Chamber. In the middle of the room is a rack used to hold down victims. Surrounding it are all manner of terrifying objects. Iron maidens, vices, tables filled with all sorts of torture instruments and shackles along the walls stained in blood are just to name a few of the horrifying scenes that exist in this room. Obviously, this room is kept locked. Not many would want to find themselves inside. Not even by accident.
3. Rules
• Mo citizens gain free and unlimited access to the Training Area and Alchemy Lab. When using either, each post should state which room you are in.
• Anyone training inside of the Training Area gains a bonus of +1 TP per post.
• The Alchemy Lab will give alchemists a +100 circumstance bonus on Alchemy if they are alone. This changes to +80 if the Lab is being shared.
• Outsiders must either gain Zuruel or the Duchess’s permission before they can step a foot anywhere in the building other than the Reception.
• Each and every inch of the Research and Training Center is strictly a no combat zone. Anyone who starts a fight outside of the Training Area’s designated sparring zone will be escorted or forced out of the building by armed guards.
• Zuruel always has priority access to the Alchemy Lab.
• Only Zuruel has access to and knowledge of the secret Underground Area below the Lab.
Components
All credits go to Skulking Shinzu

1. Description
Deep within Mo stands the new and freshly built Research and Training Center which was generously funded by Zuruel Kedoin. There are no entrances or exits except the main one at the front of the castle, which can only be accessed via a draw bridge. This bridge is the only means to accessing the entrance of the castle due to the artificially created moat which extends all around the raised chunk of ground that the castle has been built on. Much like the name suggests, the purpose of the building is to research technological advancements and to train Mo troops. Despite this, however, the building’s heavy fortifications and security does mean that it can easily double out as a protective fortress in times of war.
2. Layout
2.1 Drawbridge
As mentioned previously, there is only one way in or out of the structure and that’s via the drawbridge. Generally, this drawbridge is kept lowered for ease of access to Mo citizens. This only changes in times of war, where the drawbridge will remain raised and will only lower for a few moments to allow appropriate citizens entry and exit. Highly trained guards are always kept stationed on the bridge that connects to the drawbridge when it is lowered. Regardless of circumstance, these guards will always check to ensure that only citizens of Mo are entering and exiting the castle.
2.2 Outer Walls
The entire Research and Training Center is built out of stone in the form of a very sturdy four-walled fortress. Embedded into each corner of the structure is a guard post, meaning a total of four overall. Each guard post is tall and reaches higher than the walls of the structure, giving all those inside a perfect vantage point and view of the entire surrounding area. Along with a spiraling staircase, each guard post is outfitted with tiny slits for soldiers to fire arrows out of. The only other notable feature around the outer walls would be the barbican, which sits above the gate behind the drawbridge. The soldiers camped inside usually act as the first line of defense against unwanted foes who may have somehow made it past the drawbridge.
2.3 Reception/Lobby
Once past the drawbridge and giant iron gate behind that, visitors will find themselves in a very welcoming lobby. This lobby contains rows of seats on either side and a tall closed off gate across the room with a receptionist sitting behind a desk in the middle. To get past these gates, visitors must either use their Mo citizenship cards to open the barrier or speak to the receptionist first for permission to enter. Beyond these gates is the second half of the lobby, which contains comfortable sofas and hallways which split into three different locations.
2.4 Empty Room/Under Construction
Towards the left of the Lobby is a long hallway that leads to an empty room. This area is under construction and contains nothing of any real interest or value. For this reason, it is usually kept closed off. Rumor has it that this room will have a Smithy built into it at some point in the future.
2.5 Training Area
Straight ahead from the Lobby is a door that will directly lead to a large open field that contains multiple pieces of training equipment scattered around the area. Generally, this consists of stuff such as dummies for target practice, weapon racks and designated areas for running, sports and sparring. The far side of the Training Area also contains an enclosed space with rows of chair and a small pool for swimming. Generally, this is where the citizens of Mo will be lead to and made comfortable while they watch the soldiers practice and train. Not only does this provide them with entertainment, but the atmosphere and cheering is said to motivate the soldiers into training more intensely.
2.6 Alchemy Lab
The right of the Lobby contains another long hallway which eventually leads to a locked door. For the sake of everyone’s safety, special permission is needed to earn a key card which gives visitor’s access to the Lab. Anyone who steps inside will immediately notice the walls, which are covered in blackboards. Unlike the rest of the center, the floor in this room is tiled in order to prevent certain spilled chemicals from burning all the way through. Visitors will also notice rows upon rows of state-of-the-art equipment spread along the Lab and several beakers which are constantly bubbling away in Zuruel’s private section of the lab.
2.7 Underground Prison
Rumor has it that the Lab is actually a front for a secret room which contains far more terrifying and heinous experiments. While no one actually has any evidence of this, there is a secret room somewhere in the Lab which is kept well-hidden and inaccessible thanks to a specialized nine digit lock which can only be opened by Zuruel. This door leads to stairs that will take the visitor to a secret Underground Prison. This area contains two cells, which usually house criminals or unfortunate targets that Zuruel may have been specifically asked to bring in alive. Being sound proofed, it is impossible to hear any of the prisoner’s screams and the layers of concrete around the area also prevents enhanced vision or X-ray from discovering this area’s existence.
2.8 Torture Chamber
On the far side of the Underground Prison stands a sturdy iron door. Behind this door is a freakish Torture Chamber. In the middle of the room is a rack used to hold down victims. Surrounding it are all manner of terrifying objects. Iron maidens, vices, tables filled with all sorts of torture instruments and shackles along the walls stained in blood are just to name a few of the horrifying scenes that exist in this room. Obviously, this room is kept locked. Not many would want to find themselves inside. Not even by accident.
3. Rules
• Mo citizens gain free and unlimited access to the Training Area and Alchemy Lab. When using either, each post should state which room you are in.
• Anyone training inside of the Training Area gains a bonus of +1 TP per post.
• The Alchemy Lab will give alchemists a +100 circumstance bonus on Alchemy if they are alone. This changes to +80 if the Lab is being shared.
• Outsiders must either gain Zuruel or the Duchess’s permission before they can step a foot anywhere in the building other than the Reception.
• Each and every inch of the Research and Training Center is strictly a no combat zone. Anyone who starts a fight outside of the Training Area’s designated sparring zone will be escorted or forced out of the building by armed guards.
• Zuruel always has priority access to the Alchemy Lab.
• Only Zuruel has access to and knowledge of the secret Underground Area below the Lab.
Components
Laboratory, Perfected
Rank: "A"
Type: Main, Room, 1 Stronghold Space, Craftsman Room
Effect: An advanced laboratory to help Alchemists create concoctions.
Special: ---
Drawback: ---
Description: With this laboratory, the alchemist has every tool they may need at their ready disposal. This includes the things described in Alchemical Laboratory, Basic, plus an even broader of tools. The walls of this place is covered with blackboards upon which all sorts of obscure notes can be scrawled. The floor is made of rough tile, all the easier to clean chemical spills off while not being too slick to cause slips in such situations. The room includes four basins, each which has a barrel (Barrel, Large (Overview)) of water suspended over it, complete with a tap to permit easy access at all times. An emergency barrel (Barrel, Large (Overview)) mounted on a hinged platform can be tilted to pour water over a person in case of emergency. A single Alchemist using this laboratory and having its resources all to himself receives a +100 circumstance bonus to their Alchemy. Alternatively, up to 4 alchemists can share this space at the same time, and they each receive a +80 circumstance bonus on their Alchemy skill.
Limit: Must be created by a Construction Crafter.
Cost: 130,000 Ryo
Smithy, Perfected
Rank: "S"
Type: Main, Room, 3 Stronghold Space, Craftsman Room
Effect: A Crafting Room dedicated for all kinds of Blacksmithing/Metalworking.
Special: ---
Drawback: ---
Description: Similar to the basic smithy, this area features a polished stone floor and marble-encased forge of the highest quality. Working in this smithy gives a character a +80 circumstance bonus on any Craft pertaining to Blacksmithing/Metalworking (Armour, Blacksmithing/Metalworking, etc.) checks. This area requires the services of a smith. There may be up to 6 people working in this area.
Limit: Must be created by a Construction Crafter.
Cost: 130,000 Ryo
Lava Forge
Rank: "S"
Type: Main, Room, 1 Stronghold Space, Craftsman Room
Effect: A specialized forge used to help people craft metal items.
Special: ---
Drawback: ---
Description: This room consists of the usual elements of a forge with the exception that all tools used are of masterwork quality. In the place of an ordinary forge is a lava forge. The lava forge draws up lava from deep underground, allowing blacksmiths to craft metal items and equipment more easily.
This appears to be an ordinary forge, except that the material within is molten rock as opposed to coals and fire. This allows blacksmiths to work metals at much higher temperatures, giving them greater control over their creations. The lava forge reduces the time required to make a metal item by +1 (Example: Base Crafting time is 1/3rd of item cost. This Forge improves crafting time by +1 making it 1/4 of item cost). This bonus is circumstance bonus. This forge may be accompanied by a Smithy Room.
Limit: Must be created by a Construction Crafter.
Cost: 95,000 Ryo
Barbican
Rank: "C"
Type: Main, Room, 1 Stronghold Space, Craftsman Room
Effect: This room sites atop a gate or gatehouse, usually in an exterior wall.
Special: ---
Drawback: ---
Description: This room sites atop a gate or gatehouse, usually in an exterior wall. It features murder holes/arrow slits (included in the price) in the floor, through which the guards can attack those in the area below (little more than a hallway that usually includes a portcullis or sturdy door at each end).
Limit: Must be created by a Construction Crafter.
Cost: 10,000 Ryo
Common Area, Basic
Rank: "C"
Type: Main, Room, 1 Stronghold Space, Craftsman Room
Effect: Describe a type of shared lounge, most often found in dormitories.
Special: ---
Drawback: ---
Description: This plain room features bare floors with a few benches and walls with uninspiring artwork or tapestries. It might serve as a waiting room, a general meeting area, or an all-purpose room. Purchase this component multiple times if you want a larger common area.
Limit: Must be created by a Construction Crafter.
Cost: 5,000 Ryo
Gatehouse
Rank: "C"
Type: Main, Room, 0.5 Stronghold Space, Craftsman Room
Effect: A house or enclosure near a gateway.
Special: ---
Drawback: ---
Description: This space usually serves as a primary entrance into the stronghold (or one of many entrances). As its name suggests, the gatehouse includes a gate (and a drawbridge, if stationed adjacent to a moat). Defense can be enhanced with a portcullis. Most gatehouses are fortified with a barbican, guard post, or both.
Limit: Must be created by a Construction Crafter.
Cost: 5,000 Ryo
Guard Post x4
Rank: "C"
Type: Main, Room, 0.5 Stronghold Space, Craftsman Room
Effect: A small building for the soldiers who are protecting a place.
Special: ---
Drawback: ---
Description: This component allows guards to keep watch upon the surrounding environs. If part of the exterior wall, it includes free arrow slits instead of a window.
Limit: Must be created by a Construction Crafter.
Cost: 5,000 Ryo
Prison Cell x2
Rank: "C"
Type: Main, Room, 0.5 Stronghold Space, Craftsman Room
Effect: A cell in a prison, in which a prisoner is locked.
Special: ---
Drawback: ---
Description: This cell includes iron shackles on the walls and hay mattresses strewn about. You can shackle up to six Medium-size prisoners in a communal cell. Alternatively, you can replace the communal cell with independent jail cells. In this arrangement, each prison cell component includes two to four small cells each capable of holding one or two Medium-size creatures. If you need a greater capacity, purchase this component multiple times. The standard prison cell comes with six sets of manacles with wretched locks capable of binding a Medium-size creature (May Purchase better Locks). A Small creature takes up half the space in a prison cell as a Medium-size creature. Manacles for Small creatures cost the same as for Medium-size creatures. Tiny and smaller creatures take up one-fourth the space, and their manacles cost 10 times normal. A Large creature takes up twice the space of a Medium-size creature, and a Huge creature four times the space. (Must Purchase Larger Manacles if needed). Generally, you can’t keep Gargantuan or larger creatures in a simple prison cell, though by buying enough components you could get a large enough space.
Limit: Must be created by a Construction Crafter.
Cost: 5,000 Ryo
Torture Chamber
Rank: "A"
Type: Main, Room, 1 Stronghold Space, Craftsman Room
Effect: A room in which torture is inflicted
Special: ---
Drawback: ---
Description: All sorts of pain-inducing devices fill this dark chamber, including an iron maiden, a rack, thumbscrews, vises, and so on. Wall-mounted shackles allow the torturer to dangle victims from chains, and a lockable cage in the center can hold a single Medium-size prisoner between sessions. A fireplace allows heating of brands, while a barrel of water stands nearby for extinguishing flames.
Limit: Must be created by a Construction Crafter.
Cost: 30,000 Ryo
Training Area, Combat
Rank: "S"
Type: Main, Room, 1 Stronghold Space, Craftsman Room
Effect: A room to train in the art of Combat.
Special: ---
Drawback: ---
Description: This open area allows guards and soldiers to train in the art of war. It has a rack of wooden weapons and padded armor, archery targets, and practice dummies. Training in these areas grant the user a Circumstance Bonus +1 additional TP per post. Up to eight people can train in such a place at once. If you need a greater capacity, you can purchase this component multiple times.
Limit: Must be created by a Construction Crafter.
Cost: 100,000 Ryo
Door, Secret (Pristine)
Rank: "A"
Type: Main, Room, 0 Stronghold Space, Door
Effect: Secret passages are hidden routes used for stealthy travel.
Special: ---
Drawback: ---
Description: A Advanced Secret Door adds a +70 against a person's Observation check to notice the Secret Door.
Limit: Must be created by a Construction Crafter.
Cost: +10,000 Ryo
Lock, Impossible (Overview)
Rank: "S"
Type: Secondary, 0 per Slot, Gadget, Mechanical, Lock
Effect: Locks that are Impossible in Quality.
Special: ---
Drawback: ---
Description: Locks with the Impossible Quality have a check modifier against the user's skill of -80%. Combination Locks: Impossible Locks have 9 Combination possibilities.
Limit: These type of items may be bought inside any Gadget Shop.
Cost: 13,000 Ryo Each
Rank: "A"
Type: Main, Room, 1 Stronghold Space, Craftsman Room
Effect: An advanced laboratory to help Alchemists create concoctions.
Special: ---
Drawback: ---
Description: With this laboratory, the alchemist has every tool they may need at their ready disposal. This includes the things described in Alchemical Laboratory, Basic, plus an even broader of tools. The walls of this place is covered with blackboards upon which all sorts of obscure notes can be scrawled. The floor is made of rough tile, all the easier to clean chemical spills off while not being too slick to cause slips in such situations. The room includes four basins, each which has a barrel (Barrel, Large (Overview)) of water suspended over it, complete with a tap to permit easy access at all times. An emergency barrel (Barrel, Large (Overview)) mounted on a hinged platform can be tilted to pour water over a person in case of emergency. A single Alchemist using this laboratory and having its resources all to himself receives a +100 circumstance bonus to their Alchemy. Alternatively, up to 4 alchemists can share this space at the same time, and they each receive a +80 circumstance bonus on their Alchemy skill.
Limit: Must be created by a Construction Crafter.
Cost: 130,000 Ryo
Smithy, Perfected
Rank: "S"
Type: Main, Room, 3 Stronghold Space, Craftsman Room
Effect: A Crafting Room dedicated for all kinds of Blacksmithing/Metalworking.
Special: ---
Drawback: ---
Description: Similar to the basic smithy, this area features a polished stone floor and marble-encased forge of the highest quality. Working in this smithy gives a character a +80 circumstance bonus on any Craft pertaining to Blacksmithing/Metalworking (Armour, Blacksmithing/Metalworking, etc.) checks. This area requires the services of a smith. There may be up to 6 people working in this area.
Limit: Must be created by a Construction Crafter.
Cost: 130,000 Ryo
Lava Forge
Rank: "S"
Type: Main, Room, 1 Stronghold Space, Craftsman Room
Effect: A specialized forge used to help people craft metal items.
Special: ---
Drawback: ---
Description: This room consists of the usual elements of a forge with the exception that all tools used are of masterwork quality. In the place of an ordinary forge is a lava forge. The lava forge draws up lava from deep underground, allowing blacksmiths to craft metal items and equipment more easily.
This appears to be an ordinary forge, except that the material within is molten rock as opposed to coals and fire. This allows blacksmiths to work metals at much higher temperatures, giving them greater control over their creations. The lava forge reduces the time required to make a metal item by +1 (Example: Base Crafting time is 1/3rd of item cost. This Forge improves crafting time by +1 making it 1/4 of item cost). This bonus is circumstance bonus. This forge may be accompanied by a Smithy Room.
Limit: Must be created by a Construction Crafter.
Cost: 95,000 Ryo
Barbican
Rank: "C"
Type: Main, Room, 1 Stronghold Space, Craftsman Room
Effect: This room sites atop a gate or gatehouse, usually in an exterior wall.
Special: ---
Drawback: ---
Description: This room sites atop a gate or gatehouse, usually in an exterior wall. It features murder holes/arrow slits (included in the price) in the floor, through which the guards can attack those in the area below (little more than a hallway that usually includes a portcullis or sturdy door at each end).
Limit: Must be created by a Construction Crafter.
Cost: 10,000 Ryo
Common Area, Basic
Rank: "C"
Type: Main, Room, 1 Stronghold Space, Craftsman Room
Effect: Describe a type of shared lounge, most often found in dormitories.
Special: ---
Drawback: ---
Description: This plain room features bare floors with a few benches and walls with uninspiring artwork or tapestries. It might serve as a waiting room, a general meeting area, or an all-purpose room. Purchase this component multiple times if you want a larger common area.
Limit: Must be created by a Construction Crafter.
Cost: 5,000 Ryo
Gatehouse
Rank: "C"
Type: Main, Room, 0.5 Stronghold Space, Craftsman Room
Effect: A house or enclosure near a gateway.
Special: ---
Drawback: ---
Description: This space usually serves as a primary entrance into the stronghold (or one of many entrances). As its name suggests, the gatehouse includes a gate (and a drawbridge, if stationed adjacent to a moat). Defense can be enhanced with a portcullis. Most gatehouses are fortified with a barbican, guard post, or both.
Limit: Must be created by a Construction Crafter.
Cost: 5,000 Ryo
Guard Post x4
Rank: "C"
Type: Main, Room, 0.5 Stronghold Space, Craftsman Room
Effect: A small building for the soldiers who are protecting a place.
Special: ---
Drawback: ---
Description: This component allows guards to keep watch upon the surrounding environs. If part of the exterior wall, it includes free arrow slits instead of a window.
Limit: Must be created by a Construction Crafter.
Cost: 5,000 Ryo
Prison Cell x2
Rank: "C"
Type: Main, Room, 0.5 Stronghold Space, Craftsman Room
Effect: A cell in a prison, in which a prisoner is locked.
Special: ---
Drawback: ---
Description: This cell includes iron shackles on the walls and hay mattresses strewn about. You can shackle up to six Medium-size prisoners in a communal cell. Alternatively, you can replace the communal cell with independent jail cells. In this arrangement, each prison cell component includes two to four small cells each capable of holding one or two Medium-size creatures. If you need a greater capacity, purchase this component multiple times. The standard prison cell comes with six sets of manacles with wretched locks capable of binding a Medium-size creature (May Purchase better Locks). A Small creature takes up half the space in a prison cell as a Medium-size creature. Manacles for Small creatures cost the same as for Medium-size creatures. Tiny and smaller creatures take up one-fourth the space, and their manacles cost 10 times normal. A Large creature takes up twice the space of a Medium-size creature, and a Huge creature four times the space. (Must Purchase Larger Manacles if needed). Generally, you can’t keep Gargantuan or larger creatures in a simple prison cell, though by buying enough components you could get a large enough space.
Limit: Must be created by a Construction Crafter.
Cost: 5,000 Ryo
Torture Chamber
Rank: "A"
Type: Main, Room, 1 Stronghold Space, Craftsman Room
Effect: A room in which torture is inflicted
Special: ---
Drawback: ---
Description: All sorts of pain-inducing devices fill this dark chamber, including an iron maiden, a rack, thumbscrews, vises, and so on. Wall-mounted shackles allow the torturer to dangle victims from chains, and a lockable cage in the center can hold a single Medium-size prisoner between sessions. A fireplace allows heating of brands, while a barrel of water stands nearby for extinguishing flames.
Limit: Must be created by a Construction Crafter.
Cost: 30,000 Ryo
Training Area, Combat
Rank: "S"
Type: Main, Room, 1 Stronghold Space, Craftsman Room
Effect: A room to train in the art of Combat.
Special: ---
Drawback: ---
Description: This open area allows guards and soldiers to train in the art of war. It has a rack of wooden weapons and padded armor, archery targets, and practice dummies. Training in these areas grant the user a Circumstance Bonus +1 additional TP per post. Up to eight people can train in such a place at once. If you need a greater capacity, you can purchase this component multiple times.
Limit: Must be created by a Construction Crafter.
Cost: 100,000 Ryo
Door, Secret (Pristine)
Rank: "A"
Type: Main, Room, 0 Stronghold Space, Door
Effect: Secret passages are hidden routes used for stealthy travel.
Special: ---
Drawback: ---
Description: A Advanced Secret Door adds a +70 against a person's Observation check to notice the Secret Door.
Limit: Must be created by a Construction Crafter.
Cost: +10,000 Ryo
Lock, Impossible (Overview)
Rank: "S"
Type: Secondary, 0 per Slot, Gadget, Mechanical, Lock
Effect: Locks that are Impossible in Quality.
Special: ---
Drawback: ---
Description: Locks with the Impossible Quality have a check modifier against the user's skill of -80%. Combination Locks: Impossible Locks have 9 Combination possibilities.
Limit: These type of items may be bought inside any Gadget Shop.
Cost: 13,000 Ryo Each
All credits go to Skulking Shinzu